Customers often want to do multiple purchases of similar items from a single store rather than order from different stores. If often happens that when a customer spend his valuable time on a store, he or she may more likely want to shop other relevant items from the similar store.
For example, if a customer wants to place an online border for a laptop, he may also prefer to purchase any accessory he may need from the same website such as laptop bag, headphones, USB drive, or mouse, etc.
The customer will appreciate if he can add such an accessory with a simple option rather than going back to the catalogue, browsing the relevant category, and selecting the product. A quick installation of WooCommerce Custom Product Options plugin can easily solve such a hassle of selecting addition store items with the kind of product options created for the ease of customers. This simple and easy to use plugin can help you in various situations such as;
– The customer can pick all the custom items at once, which they might want to purchase.
– It saves the customers time and exertion in independently looking for and requesting the custom items.
With the creation of multiple production options, the plugin can also help you understand the customers’ requirements. You can make sure of the variety of field types to create custom options that are easy to use for your target customers. Following is the step-by-step method for adding custom options to products with the help of this plugin.
Steps to Add Product Options in WooCommerce
Step 1: Download WooCommerce product option plugin
Step 2: Installation of Application
Step 3: Activate the Extension from Back-end
Step 4: 3 Steps to create Global Product Options
Step 5: Add Product-Specific Option
Step 6: Exclude Global Option
Step 7: Enable Price per Character for Text and Text Area Field
Step 8: Manage Stock of Product Options
Step 9: Import and Export Product Options
Step 1: Download WooCommerce Product Option Plugin
Download WooCommerce product option plugin from Extendons
Step 2: Installation of Application
Install the application. Select the ‘Plugins’ option and upload the plugin that you have purchased. Choose file and complete the installation process.

Step 3: Activate the Extension from Back-end
Activate the extension from ‘Installed Plugins’ section of the control panel.

Step 4: 3 Steps to create Global Product Options
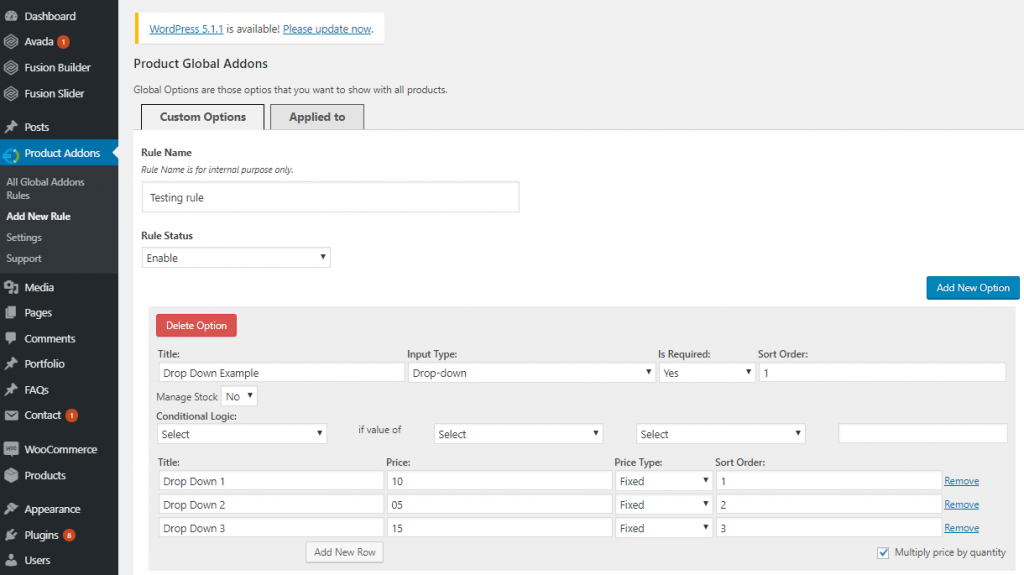
After activation, you will find a tab named ‘Add New Rule’ under Product Addons menu. Click it and then move on to hit “Add New Option” to create a new field type for the products you select.


Step 5: Add Product-Specific Option
Navigate to ‘Products’ tab, browse all products, and select any single product for which you aim to create a particular option that is not available to rest of the products. Find ‘Add New Option’ and click it to add an option specific to that product.

Step 6: Exclude Global Option
The Global options apply to all the products you select in the rule. To exclude any specific product from the rule, click and check the option ‘Exclude Global Option’ and it will disable to rule for that particular product.

Step 7: Enable Price per Character for Text and Text Area Field
You can also a field type that sets price per character and charge your customers an extra amount for customizing a product.

Step 8: Manage Stock of Product Options
Add-ons extension allows you to manage the stock of additional product option. It hides the out of stock product options on the product page.

Step 9: Import and Export Product Options
You can also import product options from a back file or export them to keep an off-line record or utilize it in another store.

Conclusion
Product Addons is a step ahead in facilitating your valued customers to add similar products to cart or communicate personalization effectively right on the product page. We hope, the above tutorial may prove helpful for you in creating custom product options to your WooCommerce-based website.

© Copyright 2023 Extendons. All Right Reserved. | Terms and Conditions | Privacy Policy
© Copyright Extendons 2023. All Right Reserved.
© Copyright Extendons 2023. All Right Reserved.
