- $USD
- English (United States)
- Hire an Expert
- Get Support
- Blog
- Create a Custom WooCommerce My Account Dashboard
A personalized WooCommerce My Account Dashboard is more than just a design upgrade, it can enhance your store’s usability, give customers a better experience, and make navigation more intuitive. In this guide, we’ll walk you through step-by-step instructions on how to build a custom My Account dashboard for your WooCommerce store.
Whether you run a fashion store, a digital marketplace, or a membership-based business, customizing this area helps users find what they need faster while also reflecting your brand’s personality.
Let’s get started!
Step 1: Set the Foundation for Your Dashboard
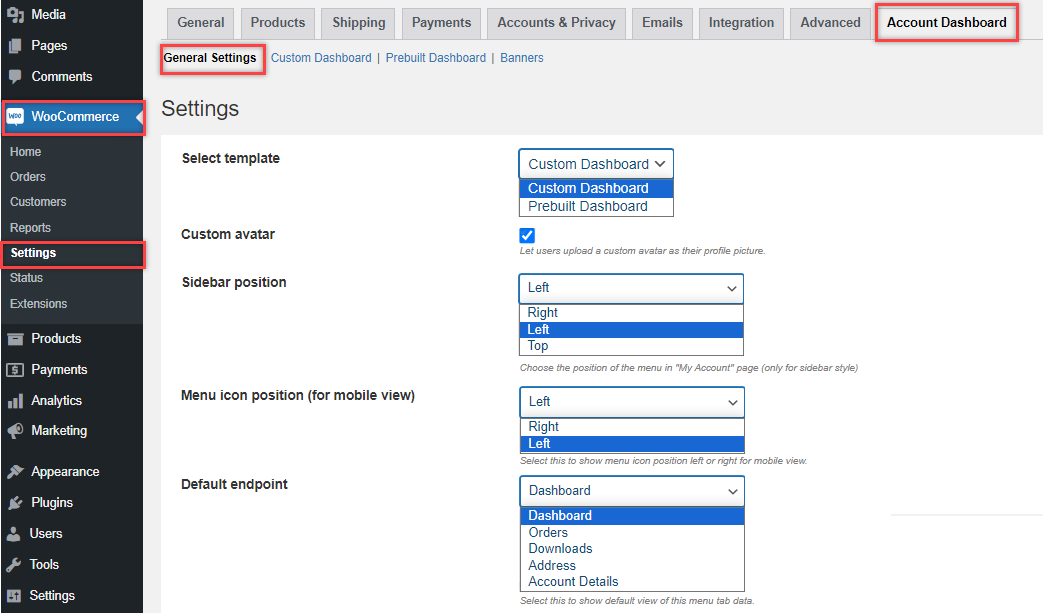
Before you begin customizing, make sure you have the right plugin installed. The Customize My Account for WooCommerce plugin makes the whole process easier, even if you don’t have coding experience.
Once installed and activated, go to the WooCommerce menu in your WordPress admin panel and look for the Account Dashboard section. Here, you'll start setting up how your new dashboard will look and function.
From the General Settings tab, you can:
- Choose between a Custom Dashboard or a Prebuilt Dashboard.
- Adjust layout settings like sidebar position (left, right, or top).
- Enable or disable avatars for users.
- Pick your color schemes, sizes, and default tab for users.
Step 2: Build Simple and Clear Navigation
Navigation is a key part of a great dashboard experience. With the plugin’s Custom Dashboard tab, you can fully control what appears in the menu.
Here’s what you can do:
- Add Groups to bundle similar menu items together (for example: “Orders”, “Downloads”, “Wishlist”).
- Add or Edit Endpoints to rename tabs, change icons, and assign them to specific user roles.
- Show or hide icons and customize their size, position, and padding.
- Organize items using drag-and-drop to adjust their position in the sidebar.
This makes your dashboard cleaner and easier for customers to use.
Step 3: Display User Details
Adding a personal touch can boost user engagement. You can allow customers to upload a custom avatar and see their profile photo when they log in.
In the settings:
- Enable avatar uploads for users.
- Choose whether avatars are shown by default.
- Customize where and how the avatar appears on the dashboard.

This feature helps users feel more connected to their accounts and adds a human touch to your store.You can check out how to edit my account page woocommerce as well.
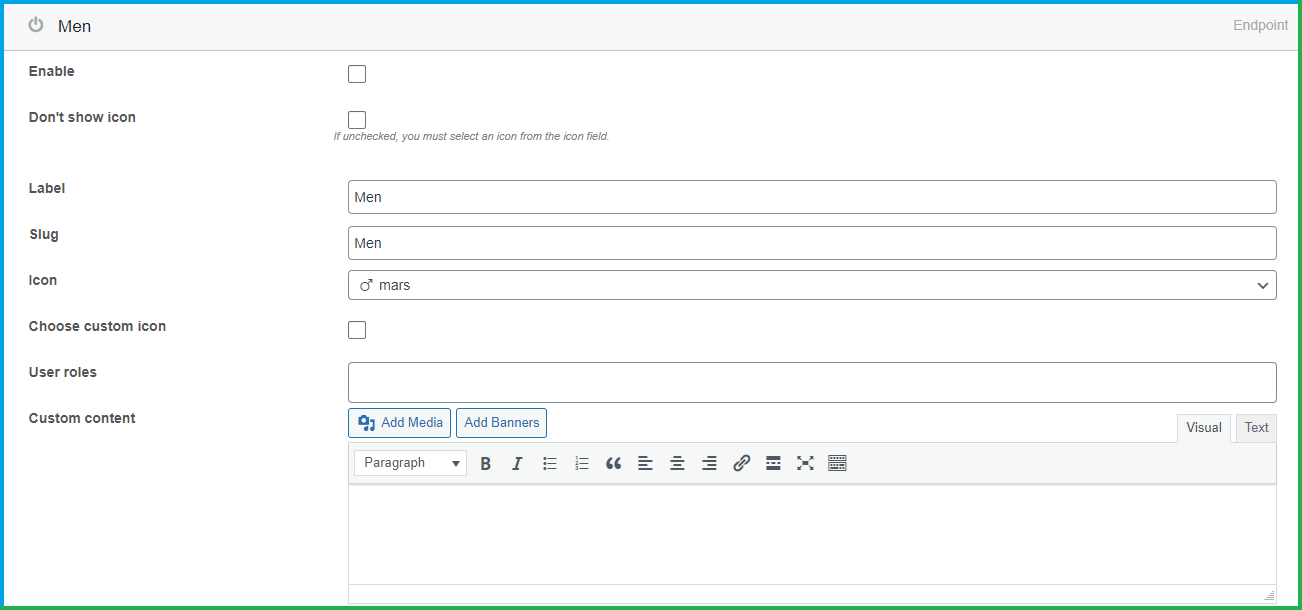
Step 4: Customize WooCommerce Endpoints
Endpoints are the sections inside the dashboard, like “Orders”, “Downloads”, or “Account Details”. This plugin gives you full control to edit or even replace these sections.
You can:
- Rename default WooCommerce tabs.
- Add custom content using a visual editor.
- Use icons, shortcodes, images, links, and even banners inside endpoints.
- Set user roles so that specific content appears only for certain customers.
There’s also the option to show dynamic item counts (like the number of items in a wishlist or pending orders), which can be displayed with badges on menu items.
Step 5: Set Up Your Pages and Links
Sometimes, you need more than just the default WooCommerce pages. With this plugin, you can create:
- Page Endpoints – show any WordPress page inside the dashboard (even hidden pages).
- Link Endpoints – redirect users to external links, product pages, or documentation.
- Grouped Tabs – combine related pages under a single dropdown-style menu.

These features are perfect for adding things like FAQs, Return Policy pages, or special offers inside the account area.
Step 6: Review and Launch
Once you’ve set everything up, it’s time to review and test. Here’s a quick checklist:
- Make sure all menu items are working.
- Check visibility for different user roles.
- Review how it looks on desktop and mobile.
- Customize banners and check links.
- Use the “Restore to Default” option if needed.
Don’t forget to ask a few customers or colleagues to test the dashboard and give feedback.
Conclusion
Building a custom WooCommerce My Account Dashboard doesn’t have to be complicated. With the Customize Account Page & User Dashboard plugin, you can create a user-friendly, professional-looking dashboard that fits your brand and improves your customers’ experience.
A custom dashboard makes your WooCommerce store feel more polished, adds trust, and gives you the flexibility to guide customers exactly where you want them to go.
Frequently Asked Questions
1. Do I need to know coding to customize the WooCommerce My Account dashboard?
No, this plugin offers a fully visual interface. You can customize everything from the admin panel without writing a single line of code.
2. Can I show different menu options to different user roles?
Yes, you can assign endpoints and banners to specific user roles. This is great for stores with multiple user types like vendors, customers, or members.
3. Will this customization affect the core WooCommerce functionality?
No, the plugin works alongside WooCommerce. You can even restore the default WooCommerce endpoints with a single click if needed.
4. Can I add custom pages or external links to the dashboard?
You can create new endpoints that link to custom pages or even outside websites. You can also set them to open in a new tab.
5. Does the plugin work with mobile devices?
Yes, the dashboard is mobile-friendly and lets you adjust icon positions and layouts for smaller screens.
Share Article
 30-day money back guarantee
 Dedicated Support Team
 Safe & Secure Free Update
 Safe Customized Solutions